

How To Make Artist Canvas
Getting Started with Android Canvas Drawing 🖼
Learn the basics of drawing with the Android Canvas Class
![]()
Diving into using the Android Canvas class can unlock magical super powers you never knew you had 🤯. Imagine being able to draw anything* your heart desires just with some basic shapes, paths and bitmaps? Well, the Android Canvas gives you just that ability.
What is a Canvas?
Canvas is a class in Android that performs 2D drawing of different objects onto the screen. The saying "a blank canvas" is very similar to what a Canvas object is on Android. It is basically, an empty space to draw onto.
The Canvas class is not a new concept, this class is actually wrapping a SKCanvas under the hood. The SKCanvas comes from SKIA, which is a 2D Graphics Library that is used on many different platforms. SKIA is used on platforms such as Google Chrome, Firefox OS, Flutter, Fuschia etc. Once you understand how the Canvas works on Android, the same drawing concepts apply to many other different platforms.
Tip: Check out the SKIA source code for a deeper understanding of the Canvas implementation.
It is useful to know that SKIA is used in the underlying code for Android, so when you get stuck trying to understand how a certain API works, you can look at the source for SKIA to gain a deeper understanding.
Canvas Coordinate System
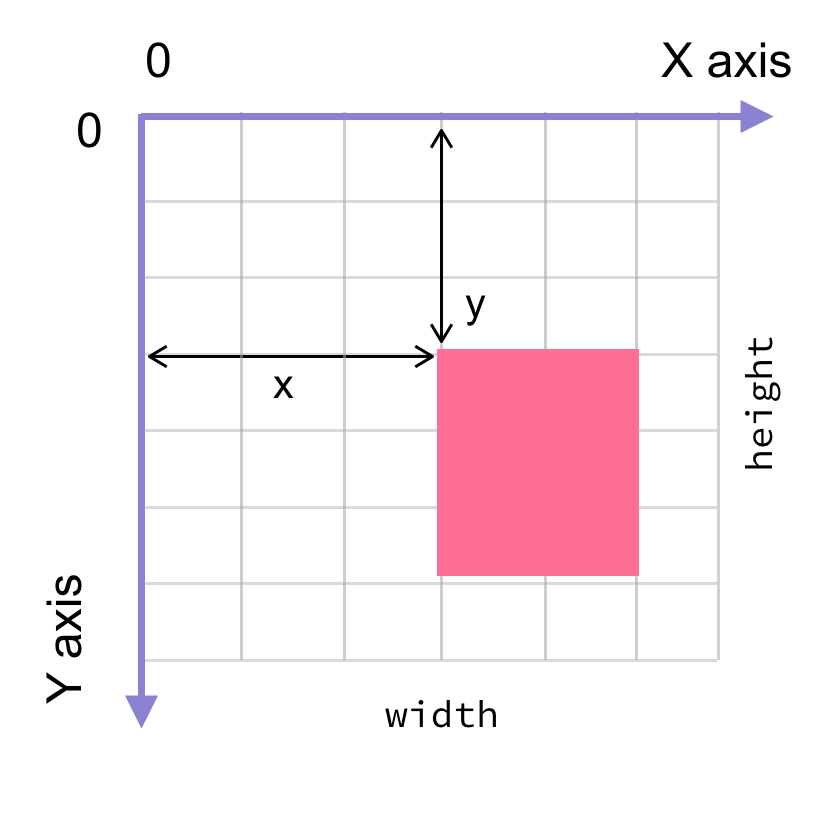
The coordinate system of the Android canvas starts in the top left corner, where [0,0] represents that point. The y axis is positive downwards, and x axis positive towards the right.
All elements drawn on a canvas are placed relative to the [0,0] point.
When working with the Canvas, you are working with px and not dp, so any methods such as translating, or resizing will be done in pixel sizes. This means you need to translate any dp values into px before calling any canvas operations. This will ensure that your drawing looks consistent across devices with different pixel densities.
Canvas draw commands will draw over previously drawn items. The last draw command will be the topmost item drawn onto your canvas. It is up to you to ensure that your items are laid out correctly (Alternatively, you might want to use some of the built-in layout mechanisms for this — such as LinearLayout).
How do I use a Canvas?
To draw onto a canvas in Android, you will need four things:
- A bitmap or a view — to hold the pixels where the canvas will be drawn.
- Canvas — to run the drawing commands on.
- Drawing commands — to indicate to the canvas what to draw.
- Paint — to describe how to draw the commands.
Get access to a Canvas instance
In order to get access to a Canvas instance, you will need to create a class that extends from View. This will then allow you to override the onDraw method, which has a Canvas as a parameter.
          class CustomView @JvmOverloads constructor(context: Context,
            attrs: AttributeSet? = null, defStyleAttr: Int = 0)
            : View(context, attrs, defStyleAttr) {              // Called when the view should render its content.
              override fun onDraw(canvas: Canvas?) {
              super.onDraw(canvas)
              // DRAW STUFF HERE
              }
}
You can then include this view inside your layout XML and this will then automatically invoke the onDraw method of the Custom View.
          <za.co.riggaroo.customviews.CustomView
            android:layout_width="200dp"
            android:layout_height="300dp"
            app:layout_constraintBottom_toBottomOf="parent"
            app:layout_constraintLeft_toLeftOf="parent"
            app:layout_constraintRight_toRightOf="parent"
            app:layout_constraintTop_toTopOf="parent"/>
You can also get access to a Canvas object by programatically creating one in code, like this:
val bitmap = Bitmap.createBitmap(width, height, Bitmap.Config.ARGB_8888) val canvas = Canvas(bitmap)
It's worth noting at this point that any Canvas created programmatically without using a View, will be software rendered and not hardware rendered. This can affect the appearance of some of the drawing commands. For instance, some commands are just not supported with hardware rendering, or only supported from a certain API level. For more information about the differences between hardware rendering and software rendering, read this post.
What can I draw on a Canvas? ✏️
There are many different things you can draw onto a Canvas. One of the most common drawing operations is to draw a bitmap (image) onto the canvas. The method for doing this is just called drawBitmap and it takes in the bitmap object that is loaded up either with Android's built-in mechanisms, or with Glide.
canvas.drawBitmap(bitmap, null, rect, paint) The second parameter here allows us to pass in the portion of the bitmap that you want to render, when passing in null the whole bitmap will be rendered. The third parameter is a RectF object which represents the scale and translation of the bitmap that you want to draw on screen.
Tip: Make sure your
RectFobject that you pass into thedrawBitmapfunction is scaled with the correct aspect ratio otherwise your output may be stretched
You need to be careful with this, since it can quite easily stretch the bitmap, as the Canvas calls don't take into account the aspect ratio of the provided image. You need to ensure the rect that is passed in is properly scaled. The fourth parameter is the paint object, we will cover the purpose of this parameter soon.
There are many other Canvas drawing methods that can give you some great looking views. We won't be covering them all here, but here are two other examples of drawing methods on the Canvas class:
To draw a circle onto the view, give it a center point x,y , its size and apaint object:
canvas.drawCircle(x, y, size, paint) Another one is the drawRect() method. This draws a rectangle on screen:
canvas.drawRect(rect, paint) This is not the full list of drawing methods but just a small highlight of some of them to get you more comfortable with the concepts, feel free to browse the Canvas documentation for a comprehensive list of all of them.
Paint 🎨
In my opinion, the Paint class is possibly the most interesting graphics class and it is also my favourite, for that very reason. There is so much that a Paint object can do that can really make your drawing operations shine. ✨
The Paint class typically holds colour and style information. The Paint object is then used for drawing objects (i.e. bitmap, text, paths etc) onto a Canvas.
To create a Paint object:
          private val textPaint =
            Paint().apply {
            isAntiAlias = true
            color = Color.RED
            style = Paint.Style.STROKE
            }
This object should be created before using it in Canvas#onDraw(). It is not recommended to create it in onDraw() since you shouldn't be doing object allocations in that method.
Tip: Use the
isAntiAliasflag to ensure your drawing has smooth edges.
The isAntiAlias flag is quite an important one. If you are drawing objects to your canvas and you notice that the edges of your objects have jagged edges, it is likely that you haven't set this flag to true. This flag indicates to the paint to smooth out the edges of the object you are drawing to the canvas.
The Paint class has more than just those three properties, there are many more things you can do with it. For instance, you can also set properties related to text rendering, such as the typeface, letterSpacing(kerning) and textSize.
          private val textPaint =
            Paint().apply {
            isAntiAlias = true
            textSize = fontSize
            letterSpacing = letterSpace
            typeface = newTypeface
            setShadowLayer(blurValue, x, y, Color.BLACK)
            }
Tip: Check that the Canvas/Paint APIs you are using work across different API versions. See this site for more information.
It is worth noting that the Paint#setShadowlayer() method doesn't work consistently across API levels and drawing commands. It works when drawing text on a Canvas, but applying the shadow to other commands such as drawBitmap doesn't yield the same results across API levels.
The reason for the inconsistency between API levels is because the Canvas APIs are bundled with the Android Platform and therefore are not updated until the OS is updated. See the list on this page for more information about which APIs work on which Android versions.
Once you've created the Paint object, pass that object into your Canvas#draw*() calls and the drawing will then take on the properties you've specified in the paint.
Next up…
In the next few articles, we will be diving into other parts of working with Canvas and drawing on Android. Be sure to subscribe to updates and follow me on Twitter for more tips.
If you prefer watching this content — be sure to check out my talk from Mobile Matters London for a summary of this content.
References:
Android Canvas Documentation
Mozilla HTML Canvas Documentation
How To Make Artist Canvas
Source: https://medium.com/over-engineering/getting-started-with-drawing-on-the-android-canvas-621cf512f4c7
Posted by: nelsoncovelf.blogspot.com
0 Response to "How To Make Artist Canvas"
Post a Comment